

04-声明式事务源码
# Spring-声明式事务源码
文档:声明式事务基础.note
Spring-声明式事务源码
@Transactional的使用
原理
事务集成过程:
解析advisor
创建动态代理
调用代理对象
顶层的事务逻辑
嵌套的事务逻辑
@Transactional的使用
SpringBoot大行其道的今天,基于XML配置的Spring Framework的使用方式注定已成为过去式。
注解驱动应用,面向元数据编程已然成受到越来越多开发者的偏好了,毕竟它的便捷程度、优势都是XML方式不可比拟的。
对SpringBoot有多了解,其实就是看你对Spring Framework有多熟悉~ 比如SpringBoot大量的模块装配的设计模式,其实它属于Spring Framework提供的能力
1、开启注解驱动
/**
 * Created by xsls on 2019/6/17.
 */
@EnableTransactionManagement
@EnableAspectJAutoProxy//(exposeProxy = true)
@ComponentScan(basePackages = {"com.tuling"})
public class MainConfig {

    @Bean
    public DataSource dataSource() {
        DruidDataSource dataSource = new DruidDataSource();
        dataSource.setUsername("root");
        dataSource.setPassword("123456");
        dataSource.setUrl("jdbc:mysql://localhost:3306/tuling-spring-trans");
        dataSource.setDriverClassName("com.mysql.jdbc.Driver");
        return dataSource;
    }

    /**
     *  配置JdbcTemplate Bean组件
     *     <bean class="org.springframework.jdbc.core.JdbcTemplate" id="jdbcTemplate">
     *         <property name="dataSource" ref="dataSource" ></property>
     *     </bean>
     * @param dataSource
     * @return
     */
    @Bean
    public JdbcTemplate jdbcTemplate(DataSource dataSource) {
        return new JdbcTemplate(dataSource);
    }

    /**
     *  配置事务管理器
     *     <bean class="org.springframework.jdbc.datasource.DataSourceTransactionManager" id="transactionManager">
     *         <property name="dataSource" ref="dataSource"></property>
     *     </bean>
     * @param dataSource
     * @return
     */
    @Bean
    public PlatformTransactionManager transactionManager(DataSource dataSource) {
        return new DataSourceTransactionManager(dataSource);
    }

}
提示:使用@EnableTransactionManagement注解前,请务必保证你已经配置了至少一个PlatformTransactionManager的Bean,否则会报错。(当然你也可以实现TransactionManagementConfigurer来提供一个专属的,只是我们一般都不这么去做~~~)
2、在你想要加入事务的方法上(或者类(接口)上)标注@Transactional注解
@Component
@Transactional(rollbackFor = Exception.class)
public class PayServiceImpl implements PayService {

    @Autowired
    private AccountInfoDao accountInfoDao;

    @Autowired
    private ProductInfoDao productInfoDao;

    public void pay(String accountId, double money) {

        //更新余额
         int retVal = accountInfoDao.updateAccountBlance(accountId,money);

        System.out.println(1/0);

    }
}
运行测试:
public static void main(String[] args) {
    AnnotationConfigApplicationContext context = new AnnotationConfigApplicationContext(MainConfig.class);

    PayService payService = (PayService) context.getBean("payServiceImpl");
    payService.pay("123456789",10);

}
就这么简单,事务就生效了(这条数据并没有insert成功~)。
原理
事务集成过程:
接下来分析注解驱动事务的原理,同样的我们从@EnableTransactionManagement开始:

@EnableTransactionManagement
@Target(ElementType.TYPE)
@Retention(RetentionPolicy.RUNTIME)
@Documented
@Import(TransactionManagementConfigurationSelector.class)
public @interface EnableTransactionManagement {
	boolean proxyTargetClass() default false;
	AdviceMode mode() default AdviceMode.PROXY;
	int order() default Ordered.LOWEST_PRECEDENCE;
}
简直不要太面熟好不好,属性和@EnableAspectJAutoProxy注解一个套路。不同之处只在于@Import导入器导入的这个类,不同的是:它导入的是个ImportSelector
TransactionManagementConfigurationSelector
它所在的包为org.springframework.transaction.annotation,jar属于:spring-tx(若引入了spring-jdbc,这个jar会自动导入)
public class TransactionManagementConfigurationSelector extends AdviceModeImportSelector<EnableTransactionManagement> {

	@Override
	protected String[] selectImports(AdviceMode adviceMode) {
		switch (adviceMode) {
			// 很显然,绝大部分情况下,我们都不会使用AspectJ的静态代理的~~~~~~~~
			// 这里面会导入两个类~~~
			case PROXY:
				return new String[] {AutoProxyRegistrar.class.getName(),
						ProxyTransactionManagementConfiguration.class.getName()};
			case ASPECTJ:
				return new String[] {determineTransactionAspectClass()};
			default:
				return null;
		}
	}
	private String determineTransactionAspectClass() {
		return (ClassUtils.isPresent("javax.transaction.Transactional", getClass().getClassLoader()) ?
				TransactionManagementConfigUtils.JTA_TRANSACTION_ASPECT_CONFIGURATION_CLASS_NAME :
				TransactionManagementConfigUtils.TRANSACTION_ASPECT_CONFIGURATION_CLASS_NAME);
	}

}
AdviceModeImportSelector目前所知的三个子类是:AsyncConfigurationSelector、TransactionManagementConfigurationSelector、CachingConfigurationSelector。由此可见后面还会着重分析的Spring的缓存体系@EnableCaching,和异步@EnableAsync模式也是和这个极其类似的~~~
AutoProxyRegistrar
从名字是意思是:自动代理注册器。它是个ImportBeanDefinitionRegistrar,可以实现自己向容器里注册Bean的定义信息
// @since 3.1
public class AutoProxyRegistrar implements ImportBeanDefinitionRegistrar {

	@Override
	public void registerBeanDefinitions(AnnotationMetadata importingClassMetadata, BeanDefinitionRegistry registry) {
		boolean candidateFound = false;

		// 这里面需要特别注意的是:这里是拿到所有的注解类型~~~而不是只拿@EnableAspectJAutoProxy这个类型的
		// 原因:因为mode、proxyTargetClass等属性会直接影响到代理得方式,而拥有这些属性的注解至少有:
		// @EnableTransactionManagement、@EnableAsync、@EnableCaching等~~~~
		// 甚至还有启用AOP的注解:@EnableAspectJAutoProxy它也能设置`proxyTargetClass`这个属性的值,因此也会产生关联影响~
		Set<String> annoTypes = importingClassMetadata.getAnnotationTypes();
		for (String annoType : annoTypes) {
			AnnotationAttributes candidate = AnnotationConfigUtils.attributesFor(importingClassMetadata, annoType);
			if (candidate == null) {
				continue;
			}
			// 拿到注解里的这两个属性
			// 说明:如果你是比如@Configuration或者别的注解的话  他们就是null了
			Object mode = candidate.get("mode");
			Object proxyTargetClass = candidate.get("proxyTargetClass");

			// 如果存在mode且存在proxyTargetClass 属性
			// 并且两个属性的class类型也是对的,才会进来此处(因此其余注解相当于都挡外面了~)
			if (mode != null && proxyTargetClass != null && AdviceMode.class == mode.getClass() &&
					Boolean.class == proxyTargetClass.getClass()) {

				// 标志:找到了候选的注解~~~~
				candidateFound = true;
				if (mode == AdviceMode.PROXY) {
					// 这一部是非常重要的~~~~又到了我们熟悉的AopConfigUtils工具类,且是熟悉的registerAutoProxyCreatorIfNecessary方法
					// 它主要是注册了一个`internalAutoProxyCreator`,但是若出现多次的话,这里不是覆盖的形式,而是以第一次的为主
					// 当然它内部有做等级的提升之类的,这个之前也有分析过~~~~
					AopConfigUtils.registerAutoProxyCreatorIfNecessary(registry);

					// 看要不要强制使用CGLIB的方式(由此可以发现  这个属性若出现多次,是会是覆盖的形式)
					if ((Boolean) proxyTargetClass) {
						AopConfigUtils.forceAutoProxyCreatorToUseClassProxying(registry);
						return;
					}
				}
			}
		}

		// 如果一个都没有找到(我在想,肿么可能呢?)
		// 其实有可能:那就是自己注入这个类,而不是使用注解去注入(但并不建议这么去做)
		if (!candidateFound && logger.isInfoEnabled()) {
			// 输出info日志(注意并不是error日志)
		}
	}

}
这一步最重要的就是向Spring容器注入了一个自动代理创建器:org.springframework.aop.config.internalAutoProxyCreator,这里有个小细节注意一下,由于AOP和事务注册的都是名字为org.springframework.aop.config.internalAutoProxyCreator 的BeanPostProcessor,但是只会保留一个,AOP的会覆盖事务的, 因为AOP优先级更大
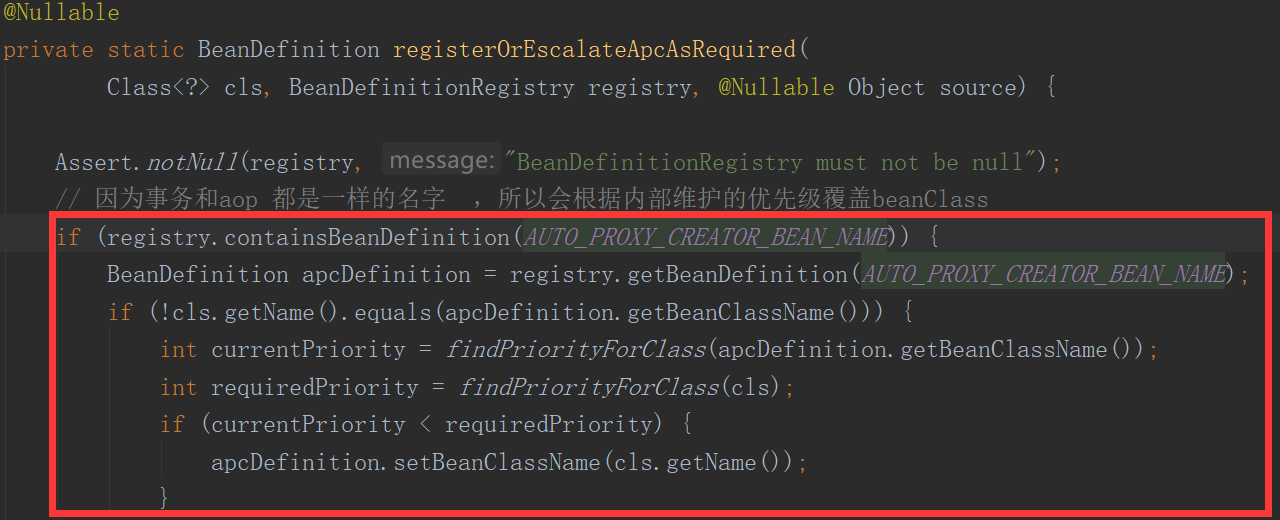
所以假如@EnableTransactionManagement和@EnableAspectJAutoProxy 同时存在, 那么AOP的 AutoProxyCreator 会进行覆盖。
ProxyTransactionManagementConfiguration
它是一个@Configuration,所以看看它向容器里注入了哪些Bean
@Configuration
public class ProxyTransactionManagementConfiguration extends AbstractTransactionManagementConfiguration {

	// 这个Advisor可是事务的核心内容。。。。。也是本文重点分析的对象
	@Bean(name = TransactionManagementConfigUtils.TRANSACTION_ADVISOR_BEAN_NAME)
	@Role(BeanDefinition.ROLE_INFRASTRUCTURE)
	public BeanFactoryTransactionAttributeSourceAdvisor transactionAdvisor() {
		BeanFactoryTransactionAttributeSourceAdvisor advisor = new BeanFactoryTransactionAttributeSourceAdvisor();
		advisor.setTransactionAttributeSource(transactionAttributeSource());
		advisor.setAdvice(transactionInterceptor());
		// 顺序由@EnableTransactionManagement注解的Order属性来指定 默认值为:Ordered.LOWEST_PRECEDENCE
		if (this.enableTx != null) {
			advisor.setOrder(this.enableTx.<Integer>getNumber("order"));
		}
		return advisor;
	}

	// TransactionAttributeSource 这种类特别像 `TargetSource`这种类的设计模式
	// 这里直接使用的是AnnotationTransactionAttributeSource  基于注解的事务属性源~~~
	@Bean
	@Role(BeanDefinition.ROLE_INFRASTRUCTURE)
	public TransactionAttributeSource transactionAttributeSource() {
		return new AnnotationTransactionAttributeSource();
	}

	// 事务拦截器,它是个`MethodInterceptor`,它也是Spring处理事务最为核心的部分
	// 请注意:你可以自己定义一个TransactionInterceptor(同名的),来覆盖此Bean(注意是覆盖)
	// 另外请注意:你自定义的BeanName必须同名,也就是必须名为:transactionInterceptor  否则两个都会注册进容器里面去~~~~~~
	@Bean
	@Role(BeanDefinition.ROLE_INFRASTRUCTURE)
	public TransactionInterceptor transactionInterceptor() {
		TransactionInterceptor interceptor = new TransactionInterceptor();
		// 事务的属性
		interceptor.setTransactionAttributeSource(transactionAttributeSource());
		// 事务管理器(也就是注解最终需要使用的事务管理器,父类已经处理好了)
		// 此处注意:我们是可议不用特殊指定的,最终它自己会去容器匹配一个适合的~~~~
		if (this.txManager != null) {
			interceptor.setTransactionManager(this.txManager);
		}
		return interceptor;
	}

}

// 父类(抽象类)  它实现了ImportAware接口  所以拿到@Import所在类的所有注解信息
@Configuration
public abstract class AbstractTransactionManagementConfiguration implements ImportAware {

	@Nullable
	protected AnnotationAttributes enableTx;
	/**
	 * Default transaction manager, as configured through a {@link TransactionManagementConfigurer}.
	 */
	// 此处:注解的默认的事务处理器(可议通过实现接口TransactionManagementConfigurer来自定义配置)
	// 因为事务管理器这个东西,一般来说全局一个就行,但是Spring也提供了定制化的能力~~~
	@Nullable
	protected PlatformTransactionManager txManager;

	@Override
	public void setImportMetadata(AnnotationMetadata importMetadata) {
		// 此处:只拿到@EnableTransactionManagement这个注解的就成~~~~~ 作为AnnotationAttributes保存起来
		this.enableTx = AnnotationAttributes.fromMap(importMetadata.getAnnotationAttributes(EnableTransactionManagement.class.getName(), false));
		// 这个注解是必须的~~~~~~~~~~~~~~~~
		if (this.enableTx == null) {
			throw new IllegalArgumentException("@EnableTransactionManagement is not present on importing class " + importMetadata.getClassName());
		}
	}

	// 可以配置一个Bean实现这个接口。然后给注解驱动的给一个默认的事务管理器~~~~
	// 设计模式都是想通的~~~
	@Autowired(required = false)
	void setConfigurers(Collection<TransactionManagementConfigurer> configurers) {
		if (CollectionUtils.isEmpty(configurers)) {
			return;
		}
		// 同样的,最多也只允许你去配置一个~~~
		if (configurers.size() > 1) {
			throw new IllegalStateException("Only one TransactionManagementConfigurer may exist");
		}
		TransactionManagementConfigurer configurer = configurers.iterator().next();
		this.txManager = configurer.annotationDrivenTransactionManager();
	}

	// 注册一个监听器工厂,用以支持@TransactionalEventListener注解标注的方法,来监听事务相关的事件
	// 通过事件监听模式来实现事务的监控~~~~
	@Bean(name = TransactionManagementConfigUtils.TRANSACTIONAL_EVENT_LISTENER_FACTORY_BEAN_NAME)
	@Role(BeanDefinition.ROLE_INFRASTRUCTURE)
	public static TransactionalEventListenerFactory transactionalEventListenerFactory() {
		return new TransactionalEventListenerFactory();
	}

}
下面重中之重来了,那就是BeanFactoryTransactionAttributeSourceAdvisor这个增强器
BeanFactoryTransactionAttributeSourceAdvisor
首先看它的父类:AbstractBeanFactoryPointcutAdvisor它是一个和Bean工厂和事务都有关系的Advisor
从上面的配置类可议看出,它是new出来一个。
使用的Advice为:advisor.setAdvice(transactionInterceptor()),既容器内的事务拦截器~~~~
使用的事务属性源为:advisor.setTransactionAttributeSource(transactionAttributeSource()),既一个new AnnotationTransactionAttributeSource()支持三种事务注解来标注~~~
// @since 2.5.5
// 它是一个AbstractBeanFactoryPointcutAdvisor ,关于这个Advisor 请参阅之前的博文讲解~~~
public class BeanFactoryTransactionAttributeSourceAdvisor extends AbstractBeanFactoryPointcutAdvisor {

	@Nullable
	private TransactionAttributeSource transactionAttributeSource;

	// 这个很重要,就是切面。它决定了哪些类会被切入,从而生成的代理对象~
	// 关于:TransactionAttributeSourcePointcut 下面有说~
	private final TransactionAttributeSourcePointcut pointcut = new TransactionAttributeSourcePointcut() {
		// 注意此处`getTransactionAttributeSource`就是它的一个抽象方法~~~
		@Override
		@Nullable
		protected TransactionAttributeSource getTransactionAttributeSource() {
			return transactionAttributeSource;
		}
	};

	// 可议手动设置一个事务属性源~
	public void setTransactionAttributeSource(TransactionAttributeSource transactionAttributeSource) {
		this.transactionAttributeSource = transactionAttributeSource;
	}

	// 当然我们可以指定ClassFilter  默认情况下:ClassFilter classFilter = ClassFilter.TRUE;  匹配所有的类的
	public void setClassFilter(ClassFilter classFilter) {
		this.pointcut.setClassFilter(classFilter);
	}

	// 此处pointcut就是使用自己的这个pointcut去切入~~~
	@Override
	public Pointcut getPointcut() {
		return this.pointcut;
	}

}
下面当然要重点看看TransactionAttributeSourcePointcut,它是怎么切入的
TransactionAttributeSourcePointcut
这个就是事务的匹配Pointcut切面,决定了哪些类需要生成代理对象从而应用事务。
// 首先它的访问权限事default 显示是给内部使用的
// 首先它继承自StaticMethodMatcherPointcut   所以`ClassFilter classFilter = ClassFilter.TRUE;` 匹配所有的类
// 并且isRuntime=false  表示只需要对方法进行静态匹配即可~~~~
abstract class TransactionAttributeSourcePointcut extends StaticMethodMatcherPointcut implements Serializable {

	// 方法的匹配  静态匹配即可(因为事务无需要动态匹配这么细粒度~~~)
	@Override
	public boolean matches(Method method, Class<?> targetClass) {
		// 实现了如下三个接口的子类,就不需要被代理了  直接放行
		// TransactionalProxy它是SpringProxy的子类。  如果是被TransactionProxyFactoryBean生产出来的Bean,就会自动实现此接口,那么就不会被这里再次代理了
		// PlatformTransactionManager:spring抽象的事务管理器~~~
		// PersistenceExceptionTranslator对RuntimeException转换成DataAccessException的转换接口
		if (TransactionalProxy.class.isAssignableFrom(targetClass) ||
				PlatformTransactionManager.class.isAssignableFrom(targetClass) ||
				PersistenceExceptionTranslator.class.isAssignableFrom(targetClass)) {
			return false;
		}

		// 重要:拿到事务属性源~~~~~~
		// 如果tas == null表示没有配置事务属性源,那是全部匹配的  也就是说所有的方法都匹配~~~~(这个处理还是比较让我诧异的~~~)
		// 或者 标注了@Transaction这样的注解的方法才会给与匹配~~~
		TransactionAttributeSource tas = getTransactionAttributeSource();
		return (tas == null || tas.getTransactionAttribute(method, targetClass) != null);
	}
	...
	// 由子类提供给我,告诉事务属性源~~~~ 我才好知道哪些方法我需要切嘛~~~
	@Nullable
	protected abstract TransactionAttributeSource getTransactionAttributeSource();
}
关于matches方法的调用时机:只要是容器内的每个Bean,都会经过AbstractAutoProxyCreator#postProcessAfterInitialization从而会调用wrapIfNecessary方法,因此容器内所有的Bean的所有方法在容器启动时候都会执行此matche方法,因此请注意缓存的使用~~~~~
解析advisor
https://www.processon.com/view/link/5f4f4c195653bb0c71e5f9f4
在Spring AOP中有过过介绍,解析事务advisor详细代码:org.springframework.aop.framework.autoproxy.BeanFactoryAdvisorRetrievalHelper#findAdvisorBeans
public List<Advisor> findAdvisorBeans() {

   /**
    * 探测器字段缓存中cachedAdvisorBeanNames 是用来保存我们的Advisor全类名
    * 会在第一个单实例bean的中会去把这个advisor名称解析出来
    */
   String[] advisorNames = this.cachedAdvisorBeanNames;
   if (advisorNames == null) {
      /**
       * 去我们的容器中获取到实现了Advisor接口的实现类
       * 而我们的事务注解@EnableTransactionManagement 导入了一个叫ProxyTransactionManagementConfiguration配置类
       * 而在这个配置类中配置了
       * @Bean(name = TransactionManagementConfigUtils.TRANSACTION_ADVISOR_BEAN_NAME)
         @Role(BeanDefinition.ROLE_INFRASTRUCTURE)
         public BeanFactoryTransactionAttributeSourceAdvisor transactionAdvisor();
         然后把他的名字获取出来保存到 本类的属性变量cachedAdvisorBeanNames中
       */
      advisorNames = BeanFactoryUtils.beanNamesForTypeIncludingAncestors(
            this.beanFactory, Advisor.class, true, false);
      this.cachedAdvisorBeanNames = advisorNames;
   }
   //若在容器中没有找到,直接返回一个空的集合
   if (advisorNames.length == 0) {
      return new ArrayList<>();
   }

   List<Advisor> advisors = new ArrayList<>();
   //ioc容器中找到了我们配置的BeanFactoryTransactionAttributeSourceAdvisor
   for (String name : advisorNames) {
      //判断他是不是一个合适的 是我们想要的 默认true
      if (isEligibleBean(name)) {
         //BeanFactoryTransactionAttributeSourceAdvisor是不是正在创建的bean
         if (this.beanFactory.isCurrentlyInCreation(name)) {
            if (logger.isDebugEnabled()) {
               logger.debug("Skipping currently created advisor '" + name + "'");
            }
         }
         //不是的话
         else {
            try {
               //显示的调用getBean方法方法创建我们的BeanFactoryTransactionAttributeSourceAdvisor返回去
               advisors.add(this.beanFactory.getBean(name, Advisor.class));
            }
            catch (BeanCreationException ex) {
               Throwable rootCause = ex.getMostSpecificCause();
               if (rootCause instanceof BeanCurrentlyInCreationException) {
                  BeanCreationException bce = (BeanCreationException) rootCause;
                  String bceBeanName = bce.getBeanName();
                  if (bceBeanName != null && this.beanFactory.isCurrentlyInCreation(bceBeanName)) {
                     if (logger.isDebugEnabled()) {
                        logger.debug("Skipping advisor '" + name +
                              "' with dependency on currently created bean: " + ex.getMessage());
                     }
                     // Ignore: indicates a reference back to the bean we're trying to advise.
                     // We want to find advisors other than the currently created bean itself.
                     continue;
                  }
               }
               throw ex;
            }
         }
      }
   }
   return advisors;
}
去我们的容器中获取到实现了Advisor接口的实现类

显示的调用getBean方法方法创建我们的BeanFactoryTransactionAttributeSourceAdvisor返回去
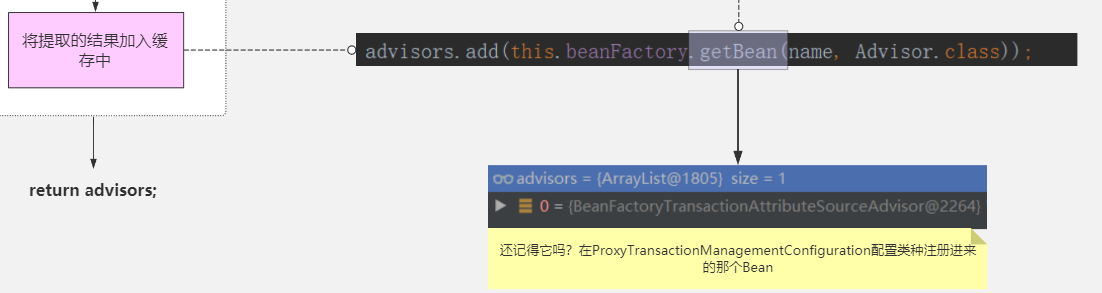
创建动态代理
https://www.processon.com/view/link/5f507c7407912902cf700145
在Spring AOP中有过过介绍,区别在于匹配方式的不同:
-
AOP是按照Aspectj提供的API 结合切点表达式进行匹配。
-
事务是根据方法或者类或者接口上面的@Transactional进行匹配。
所以本文和aop重复的就省略了如下:
// 创建Bean
createBean:524, AbstractAutowireCapableBeanFactory (org.springframework.beans.factory.support)
// 执行带 Bean的生命周期的doCreateBean
doCreateBean:614, AbstractAutowireCapableBeanFactory (org.springframework.beans.factory.support)
// 初始化方法
initializeBean:1931, AbstractAutowireCapableBeanFactory (org.springframework.beans.factory.support)
// 执行初始化后的  BeanPostProcessor
applyBeanPostProcessorsAfterInitialization:445, AbstractAutowireCapableBeanFactory (org.springframework.beans.factory.support)
// 调用创建动态代理方法   AbstractAutoProxyCreator.postProcessAfterInitialization
postProcessAfterInitialization:327, AbstractAutoProxyCreator (org.springframework.aop.framework.autoproxy)
wrapIfNecessary:378, AbstractAutoProxyCreator (org.springframework.aop.framework.autoproxy)
// 根据当前bean找到匹配的advisor
getAdvicesAndAdvisorsForBean:84, AbstractAdvisorAutoProxyCreator (org.springframework.aop.framework.autoproxy)
// 拿到before解析的所有adivsor做匹配
findEligibleAdvisors:106, AbstractAdvisorAutoProxyCreator (org.springframework.aop.framework.autoproxy)
findAdvisorsThatCanApply:144, AbstractAdvisorAutoProxyCreator (org.springframework.aop.framework.autoproxy)
findAdvisorsThatCanApply:344, AopUtils (org.springframework.aop.support)
// 根据TransactionAttributeSourcePointcut判断是否匹配
canApply:305, AopUtils (org.springframework.aop.support)
从该方法开始跟AOP有所区别了:
public static boolean canApply(Pointcut pc, Class<?> targetClass, boolean hasIntroductions) {
   Assert.notNull(pc, "Pointcut must not be null");
   // 进行类级别过滤 这里会返回
   if (!pc.getClassFilter().matches(targetClass)) {
      return false;
   }
   /**
    * 进行方法级别过滤
    */
   //如果pc.getMethodMatcher()返回TrueMethodMatcher则匹配所有方法
   MethodMatcher methodMatcher = pc.getMethodMatcher();
   if (methodMatcher == MethodMatcher.TRUE) {
      // No need to iterate the methods if we're matching any method anyway...
      return true;
   }

   //判断匹配器是不是IntroductionAwareMethodMatcher  只有AspectJExpressionPointCut才会实现这个接口
   IntroductionAwareMethodMatcher introductionAwareMethodMatcher = null;
   if (methodMatcher instanceof IntroductionAwareMethodMatcher) {
      introductionAwareMethodMatcher = (IntroductionAwareMethodMatcher) methodMatcher;
   }

   //创建一个集合用于保存targetClass 的class对象
   Set<Class<?>> classes = new LinkedHashSet<>();
   //判断当前class是不是代理的class对象
   if (!Proxy.isProxyClass(targetClass)) {
      //加入到集合中去
      classes.add(ClassUtils.getUserClass(targetClass));
   }
   //获取到targetClass所实现的接口的class对象,然后加入到集合中
   classes.addAll(ClassUtils.getAllInterfacesForClassAsSet(targetClass));

   //循环所有的class对象
   for (Class<?> clazz : classes) {
      //通过class获取到所有的方法
      Method[] methods = ReflectionUtils.getAllDeclaredMethods(clazz);
      //循环我们的方法
      for (Method method : methods) {
         //通过methodMatcher.matches来匹配我们的方法
         if (introductionAwareMethodMatcher != null ?
               // 通过切点表达式进行匹配 AspectJ方式
               introductionAwareMethodMatcher.matches(method, targetClass, hasIntroductions) :
               // 通过方法匹配器进行匹配 内置aop接口方式
               methodMatcher.matches(method, targetClass)) {
            // 只要有1个方法匹配上了就创建代理
            return true;
         }
      }
   }

   return false;
}
关键点:
-
if (!pc.getClassFilter().matches(targetClass)) {
-
初筛时事务不像aop, 上面介绍的TransactionAttributeSourcePointcut的getClassFilter是TrueClassFilter。所以所有的类都能匹配
-
if (methodMatcher instanceof IntroductionAwareMethodMatcher) {
-
事务的methodMatcher 没有实现该接口。 只有AOP的实现了该接口所以也导致下面:
-
methodMatcher.matches(method, targetClass)
-
所以事务时直接调用methodMatcher.matches进行匹配
匹配方式:
1.org.springframework.transaction.interceptor.TransactionAttributeSourcePointcut#matches
@Override
public boolean matches(Method method, @Nullable Class<?> targetClass) {
   if (targetClass != null && TransactionalProxy.class.isAssignableFrom(targetClass)) {
      return false;
   }
   /**
    * 获取我们@EnableTransactionManagement注解为我们容器中导入的ProxyTransactionManagementConfiguration
        * 配置类中的TransactionAttributeSource对象
    */
   TransactionAttributeSource tas = getTransactionAttributeSource();
   // 通过getTransactionAttribute看是否有@Transactional注解
   return (tas == null || tas.getTransactionAttribute(method, targetClass) != null);
}
关键点
-
TransactionAttributeSource tas = getTransactionAttributeSource();
-
这里获取到的时候 通过@Import 的ImportSelect 注册的配置类ProxyTransactionManagementConfiguration 中设置的AnnotationTransactionAttributeSource:它是基于注解驱动的事务管理的事务属性源,和@Transaction相关,也是现在使用得最最多的方式。
它的基本作用为:它遇上比如@Transaction标注的方法时,此类会分析此事务注解,最终组织形成一个TransactionAttribute供随后的调用。
当然还有其他的类型 ,稍微举几个例:
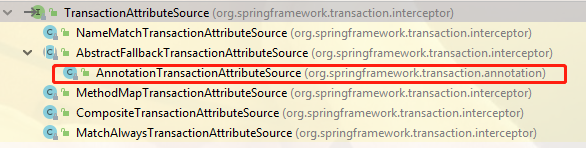
- NameMatchTransactionAttributeSource:根据名字就能匹配,然后该事务属性就会作用在对应的方法上。比如下面例子:
@Bean
public TransactionAttributeSource transactionAttributeSource() {
    Map<String, TransactionAttribute> txMap = new HashMap<>();
    // required事务  适用于增删改场景~
    RuleBasedTransactionAttribute requiredTx = new RuleBasedTransactionAttribute();
    requiredTx.setRollbackRules(Collections.singletonList(new RollbackRuleAttribute(RuntimeException.class)));
    requiredTx.setPropagationBehavior(TransactionDefinition.PROPAGATION_REQUIRED);
    txMap.put("add*", requiredTx);
    txMap.put("save*", requiredTx);
    txMap.put("insert*", requiredTx);
    txMap.put("update*", requiredTx);
    txMap.put("delete*", requiredTx);

    // 查询 使用只读事务
    RuleBasedTransactionAttribute readOnlyTx = new RuleBasedTransactionAttribute();
    readOnlyTx.setReadOnly(true);
    readOnlyTx.setPropagationBehavior(TransactionDefinition.PROPAGATION_NOT_SUPPORTED);
    txMap.put("get*", readOnlyTx);
    txMap.put("query*", readOnlyTx);

    NameMatchTransactionAttributeSource source = new NameMatchTransactionAttributeSource();
    source.setNameMap(txMap);

    return source;
}
-
MethodMapTransactionAttributeSource:它的使用方式和NameMatchTransactionAttributeSource基本相同,指定具体方法名
-
CompositeTransactionAttributeSource :组合模式,这里不细讲
2.org.springframework.transaction.interceptor.AbstractFallbackTransactionAttributeSource#getTransactionAttribute
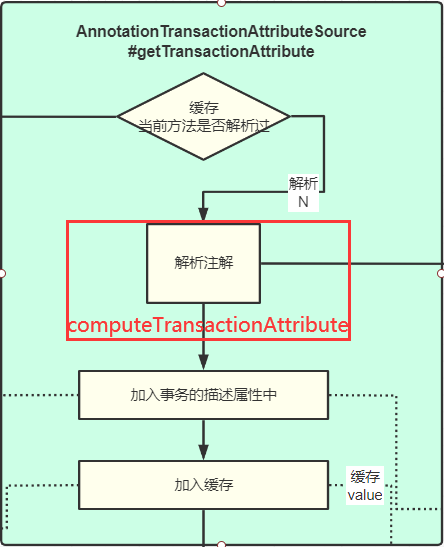
public TransactionAttribute getTransactionAttribute(Method method, @Nullable Class<?> targetClass) {
   //判断method所在的class 是不是Object类型
   if (method.getDeclaringClass() == Object.class) {
      return null;
   }

   //构建我们的缓存key
   Object cacheKey = getCacheKey(method, targetClass);
   //先去我们的缓存中获取
   TransactionAttribute cached = this.attributeCache.get(cacheKey);
   //缓存中不为空
   if (cached != null) {
      //判断缓存中的对象是不是空事务属性的对象
      if (cached == NULL_TRANSACTION_ATTRIBUTE) {
         return null;
      }
      //不是的话 就进行返回
      else {
         return cached;
      }
   }
   else {
      //我们需要查找我们的事务注解 匹配在这体现
      TransactionAttribute txAttr = computeTransactionAttribute(method, targetClass);
      // 若解析出来的事务注解属性为空
      if (txAttr == null) {
         //往缓存中存放空事务注解属性
         this.attributeCache.put(cacheKey, NULL_TRANSACTION_ATTRIBUTE);
      }
      else {
         //我们执行方法的描述符 全类名+方法名
         String methodIdentification = ClassUtils.getQualifiedMethodName(method, targetClass);
         //把方法描述设置到事务属性上去
         if (txAttr instanceof DefaultTransactionAttribute) {
            ((DefaultTransactionAttribute) txAttr).setDescriptor(methodIdentification);
         }
         if (logger.isDebugEnabled()) {
            logger.debug("Adding transactional method '" + methodIdentification + "' with attribute: " + txAttr);
         }
         //加入到缓存
         this.attributeCache.put(cacheKey, txAttr);
      }
      return txAttr;
   }
}
关键点:
-
if (cached != null) {
-
先从缓存中取, 因为这个过程相对比较耗资源,会使用缓存存储已经解析过的, 后续调用时需要获取
-
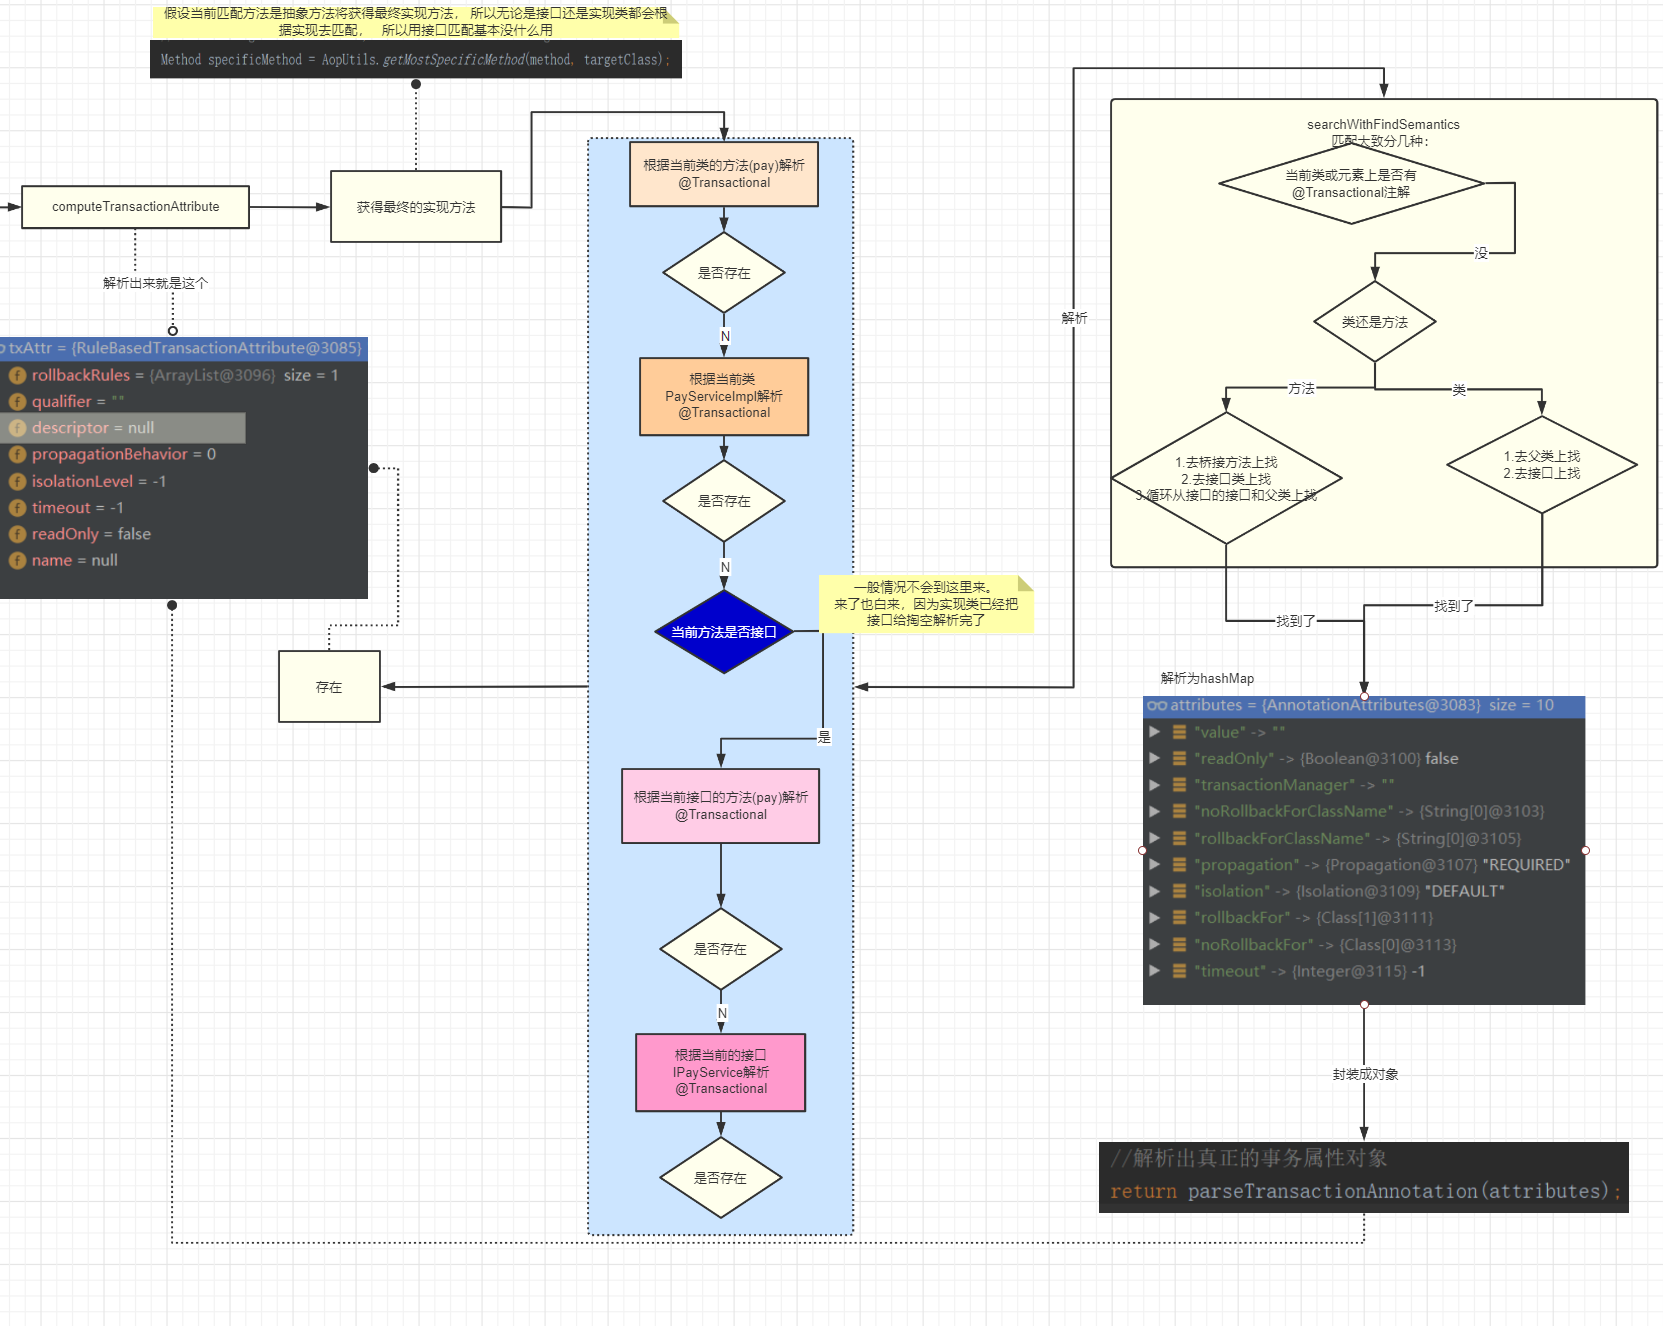
TransactionAttribute txAttr = computeTransactionAttribute(method, targetClass);
-
该方法中具体执行匹配过程 大致是: 实现类方法—>接口的方法—>实现类---->接口类
-
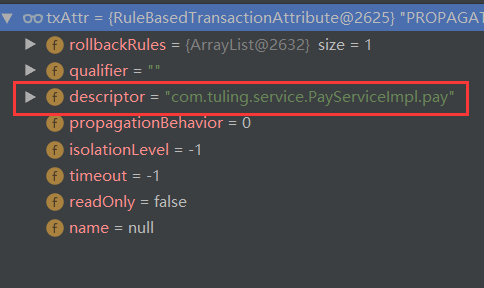
((DefaultTransactionAttribute) txAttr).setDescriptor(methodIdentification);
-
记录当前需要执行事务的方法名,记录到Descriptor 方便后续调用时判断
-
this.attributeCache.put(cacheKey, txAttr);
-
加入到缓存中
- 看下是怎么匹配的:
org.springframework.transaction.interceptor.AbstractFallbackTransactionAttributeSource#computeTransactionAttribute
@Nullable
protected TransactionAttribute computeTransactionAttribute(Method method, @Nullable Class<?> targetClass) {
   //判断我们的事务方法上的修饰符是不是public的
   if (allowPublicMethodsOnly() && !Modifier.isPublic(method.getModifiers())) {
      return null;
   }

   // The method may be on an interface, but we need attributes from the target class.
   // If the target class is null, the method will be unchanged.
   Method specificMethod = AopUtils.getMostSpecificMethod(method, targetClass);

   //第一步,我们先去目标class的方法上去找我们的事务注解
   TransactionAttribute txAttr = findTransactionAttribute(specificMethod);
   if (txAttr != null) {
      return txAttr;
   }

   //第二步:去我们targetClass类[实现类]上找事务注解
   txAttr = findTransactionAttribute(specificMethod.getDeclaringClass());
   if (txAttr != null && ClassUtils.isUserLevelMethod(method)) {
      return txAttr;
   }
   // 具体方法不是当前的方法说明  当前方法是接口方法
   if (specificMethod != method) {
      //去我们的实现类的接口上的方法去找事务注解
      txAttr = findTransactionAttribute(method);
      if (txAttr != null) {
         return txAttr;
      }
      //去我们的实现类的接口上去找事务注解
      txAttr = findTransactionAttribute(method.getDeclaringClass());
      if (txAttr != null && ClassUtils.isUserLevelMethod(method)) {
         return txAttr;
      }
   }

   return null;
}
关键点:
这个方法乍一看,觉得是先从实现类方法–>实现类—>接口方法—>接口类 但是!!!! 他在第一个实现方法查找就已经找了接口方法父类方法。在实现类里面就找了接口类和父类, 所以接口方法—>接口类 基本走了也没啥用
-
Method specificMethod = AopUtils.getMostSpecificMethod(method, targetClass);
-
得到具体方法, 如果method是接口方法那将从targetClass得到实现类的方法 , 所以说无论传的是接口还是实现, 都会先解析实现类, 所以接口传进来基本没啥用,因为findTransactionAttribute方法本身就会去接口中解析
-
TransactionAttribute txAttr = findTransactionAttribute(specificMethod);
-
根据具体方法解析
-
txAttr = findTransactionAttribute(specificMethod.getDeclaringClass());
-
根据实现类解析
@Transactional简单解释
这个事务注解可以用在类上,也可以用在方法上。
-
将事务注解标记到服务组件类级别,相当于为该服务组件的每个服务方法都应用了这个注解
-
事务注解应用在方法级别,是更细粒度的一种事务注解方式
注意 : 如果某个方法和该方法所属类上都有事务注解属性,优先使用方法上的事务注解属性。
另外,Spring 支持三个不同的事务注解 :
-
Spring 事务注解 org.springframework.transaction.annotation.Transactional(纯正血统,官方推荐)
-
JTA事务注解 javax.transaction.Transactional
-
EJB 3 事务注解 javax.ejb.TransactionAttribute
上面三个注解虽然语义上一样,但是使用方式上不完全一样,若真要使其它的时请注意各自的使用方式~
所以, 我们来看下Spring 事务注解:SpringTransactionAnnotationParser的解析:
findTransactionAttribute:146, AnnotationTransactionAttributeSource (org.springframework.transaction.annotation)
determineTransactionAttribute:164, AnnotationTransactionAttributeSource (org.springframework.transaction.annotation)
parseTransactionAnnotation:46, SpringTransactionAnnotationParser (org.springframework.transaction.annotation)
findMergedAnnotationAttributes:607, AnnotatedElementUtils (org.springframework.core.annotation)
searchWithFindSemantics:981, AnnotatedElementUtils (org.springframework.core.annotation)
searchWithFindSemantics:1009, AnnotatedElementUtils (org.springframework.core.annotation)
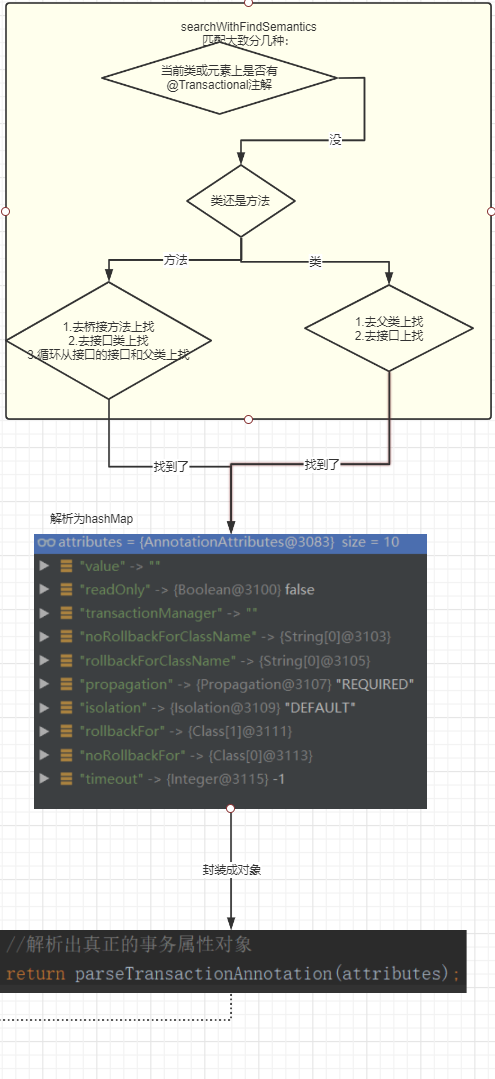
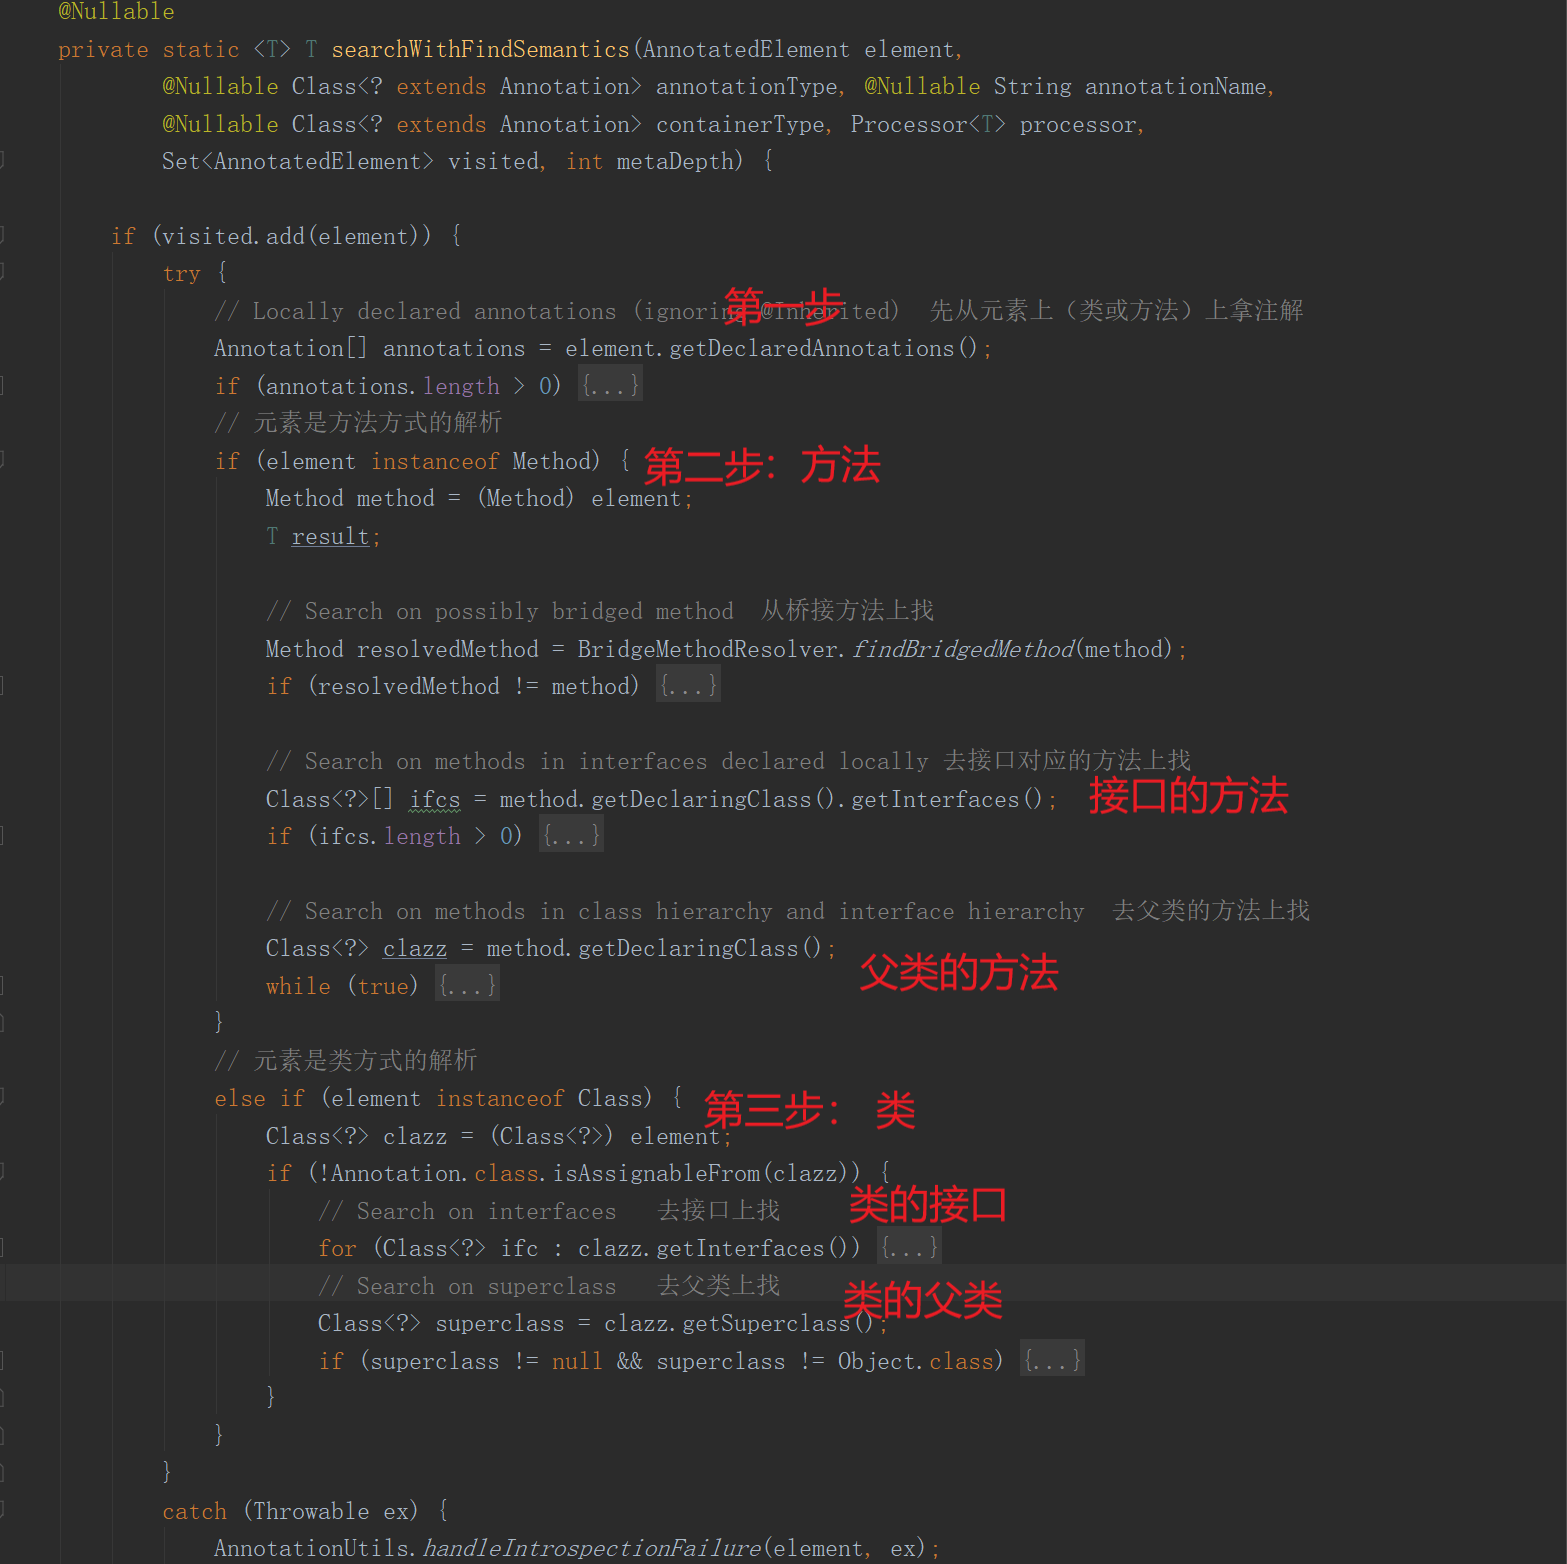
org.springframework.core.annotation.AnnotatedElementUtils#searchWithFindSemantics:
这是个公共方法, 根据传入的注解类型和元素进行匹配
- 最终会解析成TransactionAttribute
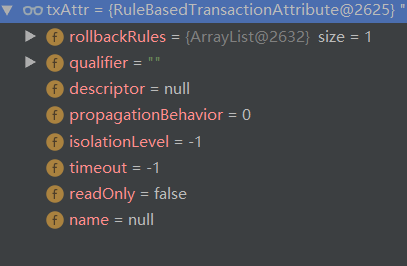
OK,解析完成!!!
- 记录当前需要执行事务的方法名,记录到descriptor 方便后续调用时判断
- 加入到缓存
this.attributeCache.put(cacheKey, txAttr);
-
如果txAttr!=null 说明解析成功,return true 匹配成功!
-
创建动态代理跟Aop的逻辑是一样的,这里就不详细说了
调用代理对象
https://www.processon.com/view/link/5f50d4c75653bb53ea8df95a
调用开始和AOP是一样的,这里省略之前的代码:
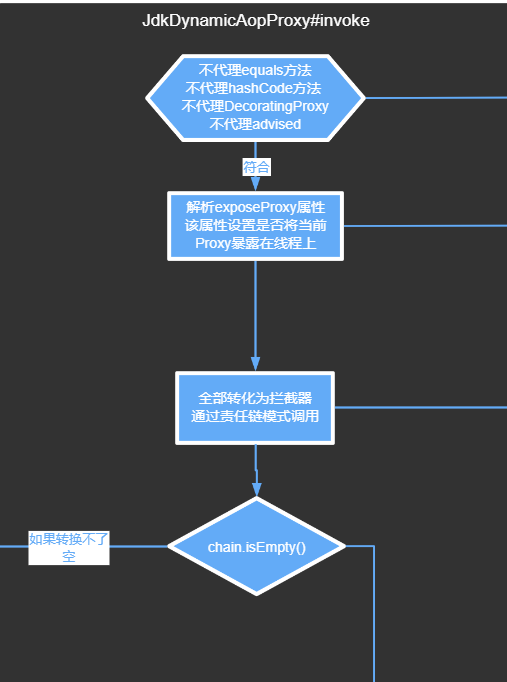
最终调用org.springframework.transaction.interceptor.TransactionAspectSupport#invokeWithinTransaction
@Nullable
protected Object invokeWithinTransaction(Method method, @Nullable Class<?> targetClass,
      final InvocationCallback invocation) throws Throwable {

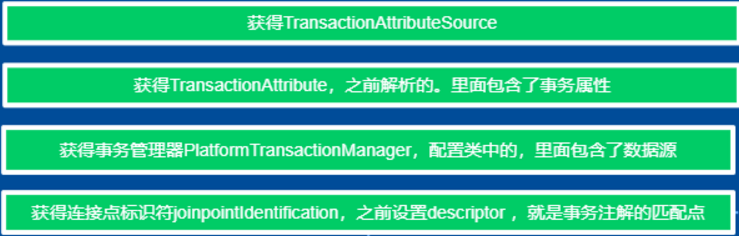
   //获取我们的事务属源对象 在配置类中添加的, 在创建代理进行匹配的时候还用了它还记得吗(将解析的事务属性赋值进去了)
   TransactionAttributeSource tas = getTransactionAttributeSource();
   // 获取解析后的事务属性信息,
   //  创建代理的时候也调用了getTransactionAttribute还记得吗, 如果解析到了事务属性就可以创建代理,
   //  在这里是从解析后的缓存中获取
   final TransactionAttribute txAttr = (tas != null ? tas.getTransactionAttribute(method, targetClass) : null);
   // 获取我们配置的事务管理器对象 在我们自己的配置类里面配置的
   final PlatformTransactionManager tm = determineTransactionManager(txAttr);
   // 从tx属性对象中获取出标注了@Transactionl的方法描述符
   // 之前往descriptor中设置的还记得吧
   final String joinpointIdentification = methodIdentification(method, targetClass, txAttr);

   //处理声明式事务
   if (txAttr == null || !(tm instanceof CallbackPreferringPlatformTransactionManager)) {
      //有没有必要创建事务
      TransactionInfo txInfo = createTransactionIfNecessary(tm, txAttr, joinpointIdentification);

      Object retVal;
      try {
         //调用钩子函数进行回调目标方法
         retVal = invocation.proceedWithInvocation();
      }
      catch (Throwable ex) {
         //抛出异常进行回滚处理
         completeTransactionAfterThrowing(txInfo, ex);
         throw ex;
      }
      finally {
         //清空我们的线程变量中transactionInfo的值
         cleanupTransactionInfo(txInfo);
      }
      //提交事务
      commitTransactionAfterReturning(txInfo);
      return retVal;
   }
   // 编程式事务:(回调偏向)
   else {
       ...
   }
}
方法概览:
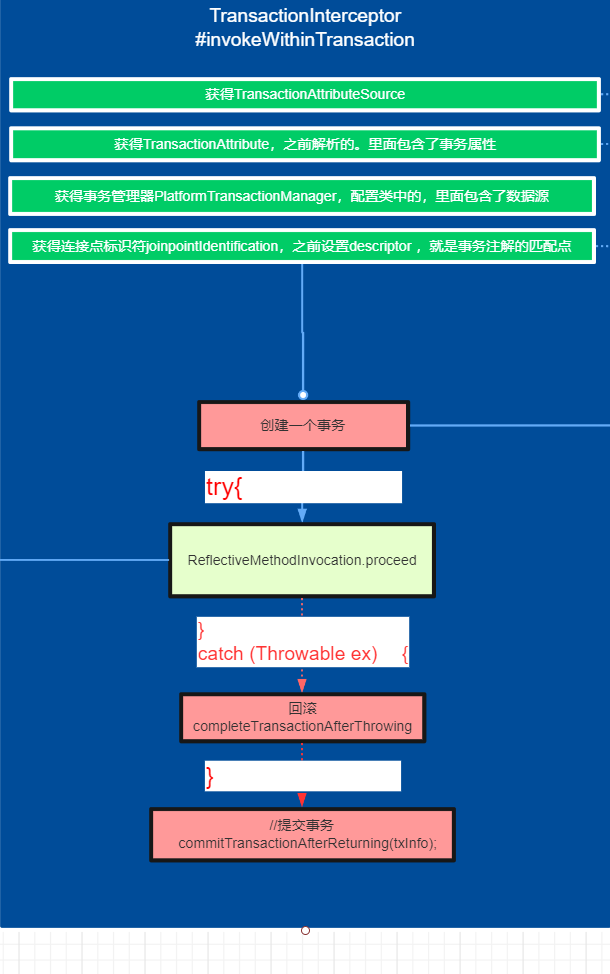
关键点:
- 前面4行都是获取一些基本信息
-
createTransactionIfNecessary 这个方法逻辑最多,事务传播行为等实现都是在这种方法
-
如果有必要会创建一个事务,什么是有必要?
-
try 中回调"连接点(事务的方法)"
-
catch中出现异常回滚事务
-
commitTransactionAfterReturning 提交事务
着重看一下createTransactionIfNecessary的逻辑实现

protected TransactionInfo createTransactionIfNecessary(@Nullable PlatformTransactionManager tm,
      @Nullable TransactionAttribute txAttr, final String joinpointIdentification) {

   // 如果还没有定义名字,把连接点的ID定义成事务的名称
   if (txAttr != null && txAttr.getName() == null) {
      txAttr = new DelegatingTransactionAttribute(txAttr) {
         @Override
         public String getName() {
            return joinpointIdentification;
         }
      };
   }

   TransactionStatus status = null;
   if (txAttr != null) {
      if (tm != null) {
         //获取一个事务状态
         status = tm.getTransaction(txAttr);
      }
      else {
         if (logger.isDebugEnabled()) {
            logger.debug("Skipping transactional joinpoint [" + joinpointIdentification +
                  "] because no transaction manager has been configured");
         }
      }
   }
   //把事物状态和事物属性等信息封装成一个TransactionInfo对象
   return prepareTransactionInfo(tm, txAttr, joinpointIdentification, status);
}
关键点:
-
将之前的Descriptor 作为事务名称
-
这里重点看下tm.getTransaction
-
tm 是我们在配置类 中的transactionManager
@Bean
public PlatformTransactionManager transactionManager(DataSource dataSource) {
    return new DataSourceTransactionManager(dataSource);
}
所以重点看下tm.getTransaction
public final TransactionStatus getTransaction(@Nullable TransactionDefinition definition) throws TransactionException {
   //尝试获取一个事务对象
   Object transaction = doGetTransaction();

   // Cache debug flag to avoid repeated checks.
   boolean debugEnabled = logger.isDebugEnabled();

   /**
    * 判断从上一个方法传递进来的事务属性是不是为空
    */
   if (definition == null) {

      definition = new DefaultTransactionDefinition();
   }

   /**
    * 判断是不是已经存在了事务对象(事务嵌套)
    */
   if (isExistingTransaction(transaction)) {
      //处理存在的事务
      return handleExistingTransaction(definition, transaction, debugEnabled);
   }

   //检查事务设置的超时时间
   if (definition.getTimeout() < TransactionDefinition.TIMEOUT_DEFAULT) {
      throw new InvalidTimeoutException("Invalid transaction timeout", definition.getTimeout());
   }

   /**
    * 若当前的事务属性式 PROPAGATION_MANDATORY 表示必须运行在事务中,若当前没有事务就抛出异常
    * 由于isExistingTransaction(transaction)跳过了这里,说明当前是不存在事务的,那么就会抛出异常
    */
   if (definition.getPropagationBehavior() == TransactionDefinition.PROPAGATION_MANDATORY) {
      throw new IllegalTransactionStateException(
            "No existing transaction found for transaction marked with propagation 'mandatory'");
   }
   /**
    * PROPAGATION_REQUIRED 当前存在事务就加入到当前的事务,没有就新开一个
    * PROPAGATION_REQUIRES_NEW:新开一个事务,若当前存在事务就挂起当前事务
    * PROPAGATION_NESTED: PROPAGATION_NESTED
       表示如果当前正有一个事务在运行中,则该方法应该运行在 一个嵌套的事务中,
       被嵌套的事务可以独立于封装事务进行提交或者回滚(保存点),
       如果封装事务不存在,行为就像 PROPAGATION_REQUIRES NEW
    */
   else if (definition.getPropagationBehavior() == TransactionDefinition.PROPAGATION_REQUIRED ||
         definition.getPropagationBehavior() == TransactionDefinition.PROPAGATION_REQUIRES_NEW ||
         definition.getPropagationBehavior() == TransactionDefinition.PROPAGATION_NESTED) {
      /**
       * 挂起当前事务,在这里为啥传入null?
       * 因为逻辑走到这里了,经过了上面的isExistingTransaction(transaction) 判断当前是不存在事务的
       * 所有再这里是挂起当前事务传递一个null进去
       */
      SuspendedResourcesHolder suspendedResources = suspend(null);
      if (debugEnabled) {
         logger.debug("Creating new transaction with name [" + definition.getName() + "]: " + definition);
      }
      try {
         //  意思是可以进行同步
         boolean newSynchronization = (getTransactionSynchronization() != SYNCHRONIZATION_NEVER);
         // 构造事务状态对象,newTransaction=true代表是一个新事务
         DefaultTransactionStatus status = newTransactionStatus(
               definition, transaction, true, newSynchronization, debugEnabled, suspendedResources);
         //开启一个新的事物
         doBegin(transaction, definition);
         //把当前的事务信息绑定到线程变量去
         prepareSynchronization(status, definition);
         return status;
      }
      catch (RuntimeException | Error ex) {
         resume(null, suspendedResources);
         throw ex;
      }
   }
   else { //创建一个空的事务
      // Create "empty" transaction: no actual transaction, but potentially synchronization.
      if (definition.getIsolationLevel() != TransactionDefinition.ISOLATION_DEFAULT && logger.isWarnEnabled()) {
         logger.warn("Custom isolation level specified but no actual transaction initiated; " +
               "isolation level will effectively be ignored: " + definition);
      }
      boolean newSynchronization = (getTransactionSynchronization() == SYNCHRONIZATION_ALWAYS);
      return prepareTransactionStatus(definition, null, true, newSynchronization, debugEnabled, null);
   }
}
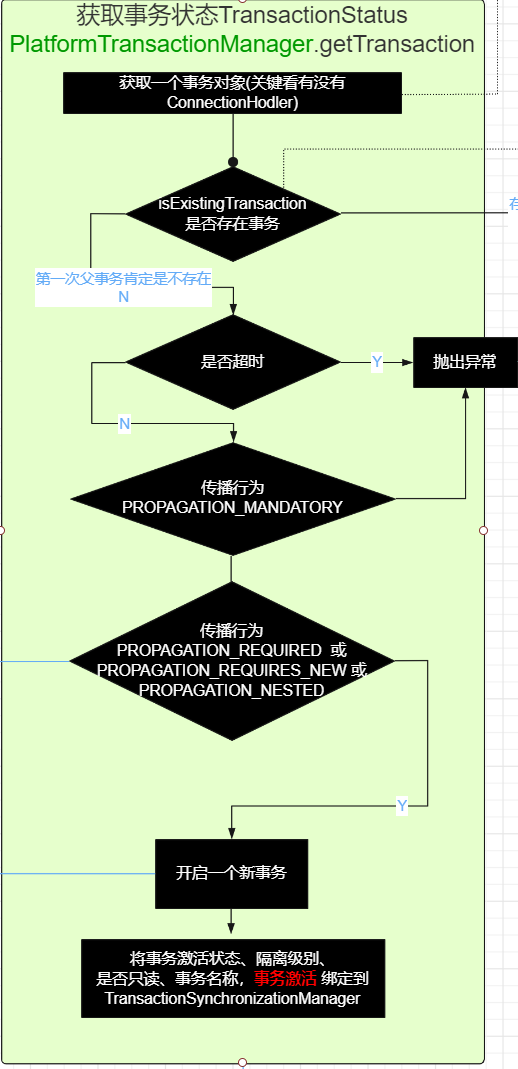
关键点:可以看到这个方法里面做了很多关于事务的逻辑实现
-
Object transaction = doGetTransaction();
-
获得事务对象,这里事务是否存在主要看它携带的ConnectionHolder(数据库连接持有者),如果ConnectionHolder有则基本说明存在事务,什么情况下会存在已存在事务? ——嵌套事务
-
if (isExistingTransaction(transaction)) {
-
这里判断是否存在事务,
-
如果已存在就处理嵌套的事务逻辑, 这里我们待会作为分支再来跟进
-
如果不存在就处理顶层的事务逻辑,下面将先介绍顶层的事务逻辑
顶层的事务逻辑
- 处理不同的传播行为,看这之前我们先了解一下事务的传播行为
| 事务传播行为类型 | 外部不存在事务 | 外部存在事务 | 使用方式 |
|---|---|---|---|
| REQUIRED(默认) | 开启新的事务 | 融合到外部事务中 | @Transactional(propagation = Propagation.REQUIRED) 适用增删改查 |
| SUPPORTS | 不开启新的事务 | 融合到外部事务中 | @Transactional(propagation = Propagation.SUPPORTS) 适用查询 |
| REQUIRES_NEW | 开启新的事务 | 挂起外部事务,创建新的事务 | @Transactional(propagation = Propagation.REQUIRES_NEW) 适用内部事务和外部事务不存在业务关联情况,如日志 |
| NOT_SUPPORTED | 不开启新的事务 | 挂起外部事务,不开启事务 | @Transactional(propagation = Propagation.NOT_SUPPORTED) 不常用 |
| NEVER | 不开启新的事务 | 抛出异常 | @Transactional(propagation = Propagation.NEVER ) 不常用 |
| MANDATORY | 抛出异常 | 融合到外部事务中 | @Transactional(propagation = Propagation.MANDATORY) 不常用 |
| NESTED | 开启新的事务 | 融合到外部事务中,SavePoint机制,外层影响内层, 内层不会影响外层 | @Transactional(propagation = Propagation.NESTED) 不常用 |
-
PROPAGATION_MANDATORY
-
当事务传播行为是MANDATORY , 所以这里直接抛出异常
-
PROPAGATION_REQUIRED || PROPAGATION_REQUIRES_NEW || PROPAGATION_NESTED
-
当事务传播行为是REQUIRED 或者 REQUIRES_NEW 或者 NESTED 都将开启一个新的事务,怎么开启:
-
suspend(null); 挂起当前事务, 顶层事务当前还没创建事务,没啥可挂的,所以传个null进去
-
newSynchronization 允许开启同步事务
-
newTransactionStatus 构造事务状态对象, 并且把事务的信息封装进去:
-
definition, 事务的属性
-
transaction, 事务的对象
-
true, 代表是一个新的事务
-
doBegin(transaction, definition); 开启一个新事务, 这里跟进去看下怎么开启的
-
prepareSynchronization(status, definition);
-
把当前的事务信息绑定到线程变量去: 为什么要绑定要线程变量呢? 因为存在嵌套事务情况下需要用到
// 事务的名称
private static final ThreadLocal<String> currentTransactionName = new NamedThreadLocal<>("Current transaction name");
// 是否为只读事务
private static final ThreadLocal<Boolean> currentTransactionReadOnly = new NamedThreadLocal<>("Current transaction read-only status");
// 当前事务的隔离级别
private static final ThreadLocal<Integer> currentTransactionIsolationLevel = new NamedThreadLocal<>("Current transaction isolation level");
// 当前事务是否激活  ,怎么样算激活:  就是有事务就是已开启, 当然到这一步一般就有事务的,因为执行doBegin就开启了
private static final ThreadLocal<Boolean> actualTransactionActive = new NamedThreadLocal<>("Actual transaction active");
看下doBegin
protected void doBegin(Object transaction, TransactionDefinition definition) {
   //强制转化事物对象
   DataSourceTransactionObject txObject = (DataSourceTransactionObject) transaction;
   Connection con = null;

   try {
      //判断事务对象没有数据库连接持有器
      if (!txObject.hasConnectionHolder() ||
            txObject.getConnectionHolder().isSynchronizedWithTransaction()) {
         //通过数据源获取一个数据库连接对象
         Connection newCon = obtainDataSource().getConnection();
         if (logger.isDebugEnabled()) {
            logger.debug("Acquired Connection [" + newCon + "] for JDBC transaction");
         }
         //把我们的数据库连接包装成一个ConnectionHolder对象 然后设置到我们的txObject对象中去
         txObject.setConnectionHolder(new ConnectionHolder(newCon), true);
      }

      //标记当前的连接是一个同步事务...?
      txObject.getConnectionHolder().setSynchronizedWithTransaction(true);
      con = txObject.getConnectionHolder().getConnection();

      // 设置isReadOnly、隔离级别
      Integer previousIsolationLevel = DataSourceUtils.prepareConnectionForTransaction(con, definition);
      txObject.setPreviousIsolationLevel(previousIsolationLevel);

      //setAutoCommit 默认为true,即每条SQL语句在各自的一个事务中执行。
      if (con.getAutoCommit()) {
         txObject.setMustRestoreAutoCommit(true);
         if (logger.isDebugEnabled()) {
            logger.debug("Switching JDBC Connection [" + con + "] to manual commit");
         }
         con.setAutoCommit(false); // 开启事务
      }

      //判断事务为只读事务
      prepareTransactionalConnection(con, definition);
      //设置事务激活
      txObject.getConnectionHolder().setTransactionActive(true);

      //设置事务超时时间
      int timeout = determineTimeout(definition);
      if (timeout != TransactionDefinition.TIMEOUT_DEFAULT) {
         txObject.getConnectionHolder().setTimeoutInSeconds(timeout);
      }

      // 绑定我们的数据源和连接到我们的同步管理器上   把数据源作为key,数据库连接作为value 设置到线程变量中
      if (txObject.isNewConnectionHolder()) {
         TransactionSynchronizationManager.bindResource(obtainDataSource(), txObject.getConnectionHolder());
      }
   }

   ...
}
关键点:
-
txObject.setConnectionHolder(new ConnectionHolder(newCon), true);
-
获取一个数据库Connection,封装到ConnectionHolder中, 是不是跟上面doGetTransaction();上下呼应了。 所以假如存在嵌套事务, 就可以拿到ConnectionHolder了
-
txObject.getConnectionHolder().setTransactionActive(true);
-
开启事务后将事务激活, 又上下呼应了
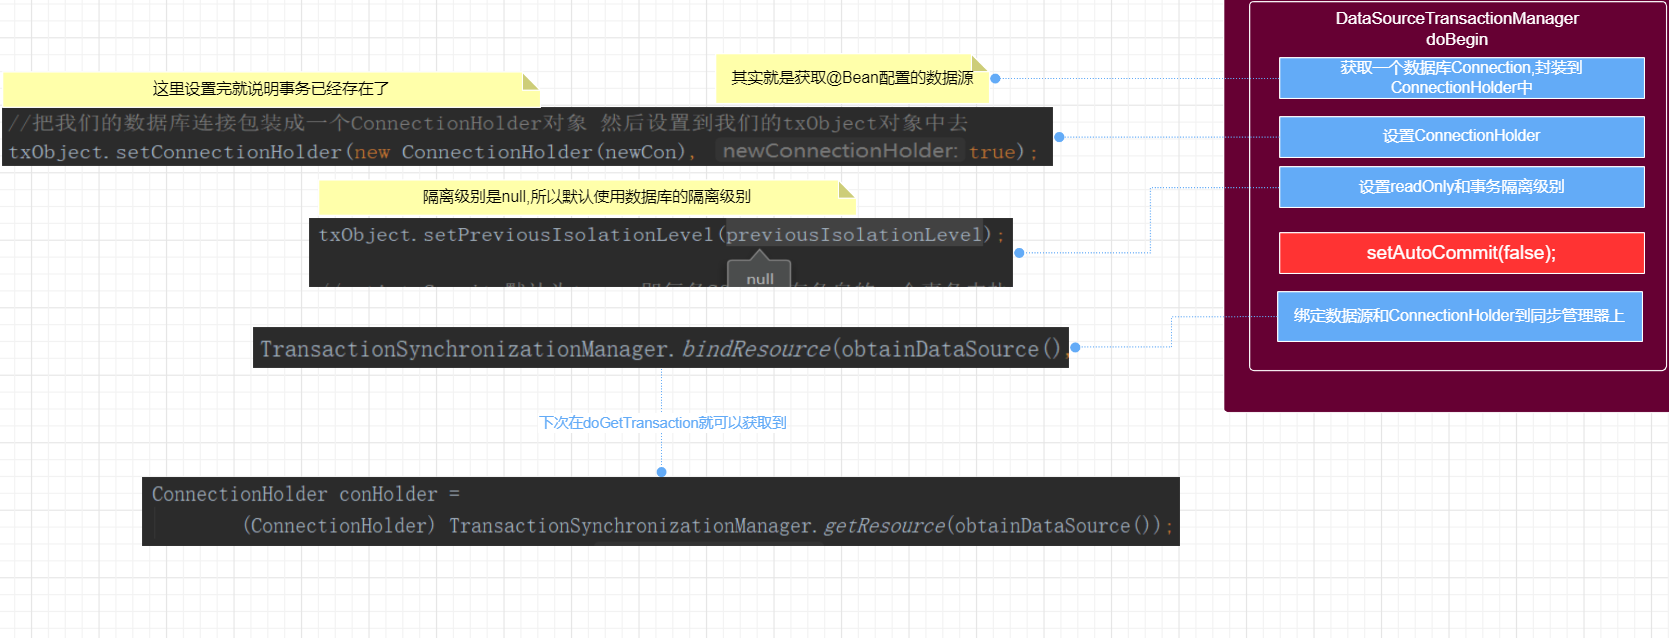
到这里,如果不存在嵌套事务的话 事务的主要逻辑代码就是这些。
嵌套的事务逻辑
ps:注意 要触发嵌套事务 如果是调用本类的方法一定要保证 将动态代理暴露在线程中:
@EnableAspectJAutoProxy(exposeProxy = true)
通过当前线程代理调用才能触发本类方法的调用:((PayService)AopContext.currentProxy()).updateProductStore(1);
在pay方法基础上加入嵌套事务方法:
public void pay(String accountId, double money) {
    //更新余额
     int retVal = accountInfoDao.updateAccountBlance(accountId,money);

    ((PayService)AopContext.currentProxy()).updateProductStore(1);
    System.out.println(1/0);

}
我们就从嵌套方法第5行开始跟踪调试:
((PayService)AopContext.currentProxy()).updateProductStore(1);
同样也会来到:
org.springframework.transaction.interceptor.TransactionAspectSupport#invokeWithinTransaction
org.springframework.transaction.interceptor.TransactionAspectSupport#createTransactionIfNecessary
org.springframework.transaction.support.AbstractPlatformTransactionManager#getTransaction
@Override
public final TransactionStatus getTransaction(@Nullable TransactionDefinition definition) throws TransactionException {
   //尝试获取一个事务对象
   Object transaction = doGetTransaction();

   // Cache debug flag to avoid repeated checks.
   boolean debugEnabled = logger.isDebugEnabled();

   /**
    * 判断从上一个方法传递进来的事务属性是不是为空
    */
   if (definition == null) {

      definition = new DefaultTransactionDefinition();
   }

   /**
    * 判断是不是已经存在了事务对象(事务嵌套)
    */
   if (isExistingTransaction(transaction)) {
      //处理存在的事务
      return handleExistingTransaction(definition, transaction, debugEnabled);
   }

    ...省略
}
-
doGetTransaction 将能获得ConnectionHolder,因为顶层事务在开启事务时已经存储。 已经存在事务意味着什么不用我说了吧
-
if (isExistingTransaction(transaction)) {
-
成立!因为事务ConnectionHolder已经存在 并且 已经激活(在doBegin中激活的)。 执行嵌套事务handleExistingTransaction
handleExistingTransaction执行嵌套事务
private TransactionStatus handleExistingTransaction(
      TransactionDefinition definition, Object transaction, boolean debugEnabled)
      throws TransactionException {

   /**
    * NEVER  存在外部事务: 抛出异常
    */
   if (definition.getPropagationBehavior() == TransactionDefinition.PROPAGATION_NEVER) {
      throw new IllegalTransactionStateException(
            "Existing transaction found for transaction marked with propagation 'never'");
   }

   /**
    * NOT_SUPPORTED 存在外部事务: 挂起外部事务
    */
   if (definition.getPropagationBehavior() == TransactionDefinition.PROPAGATION_NOT_SUPPORTED) {
      if (debugEnabled) {
         logger.debug("Suspending current transaction");
      }
      //挂起存在的事物
      Object suspendedResources = suspend(transaction);
      boolean newSynchronization = (getTransactionSynchronization() == SYNCHRONIZATION_ALWAYS);
      //创建一个新的非事物状态(保存了上一个存在事物状态的属性)
      return prepareTransactionStatus(
            definition, null, false, newSynchronization, debugEnabled, suspendedResources);
   }

   /**
    * REQUIRES_NEW 存在外部事务: 挂起外部事务,创建新的事务
    */
   if (definition.getPropagationBehavior() == TransactionDefinition.PROPAGATION_REQUIRES_NEW) {
      if (debugEnabled) {
         logger.debug("Suspending current transaction, creating new transaction with name [" +
               definition.getName() + "]");
      }
      //挂起已经存在的事物
      SuspendedResourcesHolder suspendedResources = suspend(transaction);
      try {
         // 是否需要新开启同步
         boolean newSynchronization = (getTransactionSynchronization() != SYNCHRONIZATION_NEVER);
         //创建一个新的事物状态(包含了挂起的事务的属性)
         DefaultTransactionStatus status = newTransactionStatus(
               definition, transaction, true, newSynchronization, debugEnabled, suspendedResources);
         //开启新的事物
         doBegin(transaction, definition);
         //把新的事物状态设置到当前的线程变量中去
         prepareSynchronization(status, definition);
         return status;
      }
      catch (RuntimeException | Error beginEx) {
         resumeAfterBeginException(transaction, suspendedResources, beginEx);
         throw beginEx;
      }
   }

   /**
    *NESTED 存在外部事务: 融合到外部事务中  应用层面和REQUIRED一样, 源码层面
    */
   if (definition.getPropagationBehavior() == TransactionDefinition.PROPAGATION_NESTED) {
      if (!isNestedTransactionAllowed()) {
         throw new NestedTransactionNotSupportedException(
               "Transaction manager does not allow nested transactions by default - " +
               "specify 'nestedTransactionAllowed' property with value 'true'");
      }
      if (debugEnabled) {
         logger.debug("Creating nested transaction with name [" + definition.getName() + "]");
      }
      // 是否支持保存点:非JTA事务走这个分支。AbstractPlatformTransactionManager默认是true,JtaTransactionManager复写了该方法false,DataSourceTransactionManager没有复写,还是true,
      if (useSavepointForNestedTransaction()) {
         //开启一个新的事物
         DefaultTransactionStatus status =
               prepareTransactionStatus(definition, transaction, false, false, debugEnabled, null);
         // 为事物设置一个回退点
         // savepoint 可以在一组事务中,设置一个回滚点,点以上的不受影响,点以下的回滚。(外层影响内层, 内层不会影响外层)
         status.createAndHoldSavepoint();
         return status;
      }
      else { //  JTA事务走这个分支,创建新事务
         boolean newSynchronization = (getTransactionSynchronization() != SYNCHRONIZATION_NEVER);
         DefaultTransactionStatus status = newTransactionStatus(
               definition, transaction, true, newSynchronization, debugEnabled, null);
         doBegin(transaction, definition);
         prepareSynchronization(status, definition);
         return status;
      }
   }

   // Assumably PROPAGATION_SUPPORTS or PROPAGATION_REQUIRED.
   if (debugEnabled) {
      logger.debug("Participating in existing transaction");
   }
   if (isValidateExistingTransaction()) {
      if (definition.getIsolationLevel() != TransactionDefinition.ISOLATION_DEFAULT) {
         Integer currentIsolationLevel = TransactionSynchronizationManager.getCurrentTransactionIsolationLevel();
         if (currentIsolationLevel == null || currentIsolationLevel != definition.getIsolationLevel()) {
            Constants isoConstants = DefaultTransactionDefinition.constants;
            throw new IllegalTransactionStateException("Participating transaction with definition [" +
                  definition + "] specifies isolation level which is incompatible with existing transaction: " +
                  (currentIsolationLevel != null ?
                        isoConstants.toCode(currentIsolationLevel, DefaultTransactionDefinition.PREFIX_ISOLATION) :
                        "(unknown)"));
         }
      }
      if (!definition.isReadOnly()) {
         if (TransactionSynchronizationManager.isCurrentTransactionReadOnly()) {
            throw new IllegalTransactionStateException("Participating transaction with definition [" +
                  definition + "] is not marked as read-only but existing transaction is");
         }
      }
   }
   boolean newSynchronization = (getTransactionSynchronization() != SYNCHRONIZATION_NEVER);
   return prepareTransactionStatus(definition, transaction, false, newSynchronization, debugEnabled, null);
}
关键点:
- 根据事务传播行为作处理:
| 事务传播行为类型 | 外部不存在事务 | 外部存在事务 | 使用方式 |
|---|---|---|---|
| REQUIRED(默认) | 开启新的事务 | 融合到外部事务中 | @Transactional(propagation = Propagation.REQUIRED) 适用增删改查 |
| SUPPORTS | 不开启新的事务 | 融合到外部事务中 | @Transactional(propagation = Propagation.SUPPORTS) 适用查询 |
| REQUIRES_NEW | 开启新的事务 | 挂起外部事务,创建新的事务 | @Transactional(propagation = Propagation.REQUIRES_NEW) 适用内部事务和外部事务不存在业务关联情况,如日志 |
| NOT_SUPPORTED | 不开启新的事务 | 挂起外部事务 | @Transactional(propagation = Propagation.NOT_SUPPORTED) 不常用 |
| NEVER | 不开启新的事务 | 抛出异常 | @Transactional(propagation = Propagation.NEVER ) 不常用 |
| MANDATORY | 抛出异常 | 融合到外部事务中 | @Transactional(propagation = Propagation.MANDATORY) 不常用 |
| NESTED | 开启新的事务 | 融合到外部事务中,SavePoint机制,外层影响内层, 内层不会影响外层 | @Transactional(propagation = Propagation.NESTED) 不常用 |
-
PROPAGATION_NEVER 抛出异常
-
当事务传播行为是MANDATORY ,外部存在事务抛出异常: 所以这里直接抛出异常
-
PROPAGATION_NOT_SUPPORTED 挂起外部事务,不开启事务提交
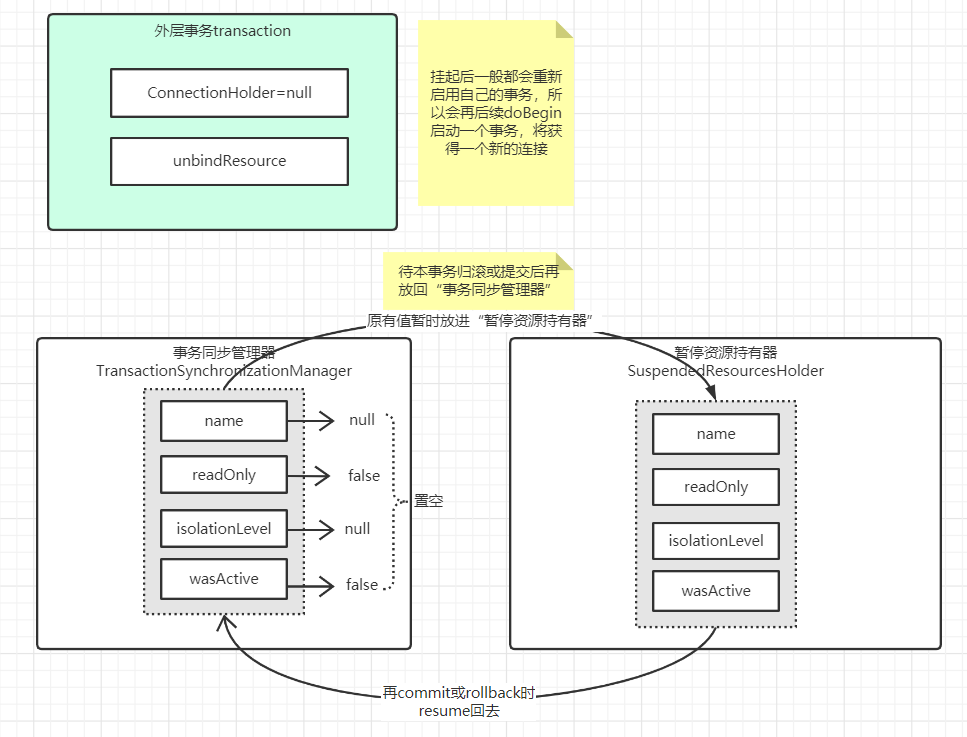
- suspend(transaction); 挂起当前顶层事务,怎么挂呢? 其实就是将线程变量里面的事务信息拿出来,再置空。 待事务提交或回滚后再放回线程变量中
-
newSynchronization 允许开启同步事务
-
newTransactionStatus 构造事务状态对象, 并且把事务的信息封装进去:
-
definition, 事务的属性
-
transaction, null 因为它不开启事务
-
false, 不是新事务
-
suspendedResources 挂起的事务对象,在事务提交或回滚后会调用重新放回线程变量中
-
prepareSynchronization(status, definition);
把当前的事务信息绑定到线程变量去: 为什么要绑定要线程变量呢? 因为存在嵌套事务情况下需要用到
- PROPAGATION_REQUIRES_NEW 挂起外部事务,创建新的事务
-
suspend(null); 挂起当前顶层事务,怎么挂呢? 其实就是将线程变量里面的事务信息拿出来,再置空。 待事务提交或回滚后再放回线程变量中
-
newSynchronization 允许开启同步事务
-
newTransactionStatus 构造事务状态对象, 并且把事务的信息封装进去:
-
definition, 事务的属性
-
transaction, 事务的对象
-
true, 代表是一个新的事务
-
suspendedResources 挂起的事务对象,在事务提交或回滚后会调用重新放回线程变量中
-
doBegin(transaction, definition); 开启一个新事务, 这里跟进去看下怎么开启的
-
prepareSynchronization(status, definition);
-
把当前的事务信息绑定到线程变量去: 为什么要绑定要线程变量呢? 因为存在嵌套事务情况下需要用到
-
PROPAGATION_NESTED 融合到外部事务中,SavePoint机制,外层影响内层, 内层不会影响外层
-
这个不做过多介绍, 去了解一下jdbc的Savepoint自然就懂了
-
return prepareTransactionStatus(definition, transaction, false, newSynchronization, debugEnabled, null);
-
definition, 原事务的属性
-
transaction, 原事务的对象
-
newTransaction:false, 代表不是一个新的事务,如果不是新事务,提交事务时: 由外层事务控制统一提交事务
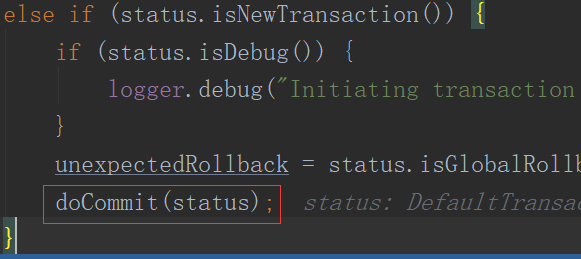
所以最终返回一个DefaultTransactionStatus, 后续回滚、提交 都可以根据改对象进行控制。 回滚提交逻辑比较简单不在这里重复了
问题
简述Spring事务的原理机制。
描述事务的各传播机制及原理
文档:04-声明式事务源码.note
评论区